

Learn how to train YOLO models to detect animals in the wild using the African Wildlife Dataset and use the model to run inferences on unseen images.
Learn how to train YOLO models to detect animals in the wild using the African Wildlife Dataset and use the model to run inferences on unseen images.
Our planet’s wildlife is incredibly diverse, from buzzing bees to towering elephants, and preserving this biodiversity is key to maintaining a balanced ecosystem. However, conservation efforts are becoming more challenging due to habitat loss, poaching, and climate change. All of these factors negatively affect wildlife populations.
Traditional animal monitoring methods, like manually analyzing camera trap images and conducting field surveys, can be slow and require a lot of resources. These efforts often fail to cover large areas and big populations effectively.
To overcome these limitations, artificial intelligence (AI) can be used as an impactful tool in wildlife conservation. Specifically, computer vision models like Ultralytics YOLO11 can analyze visual data like images and videos to automate the real-time identification and tracking of animals.
Computer vision tasks like object detection and instance segmentation, supported by YOLO11, are very useful here. By analyzing visual data, these tasks help us collect crucial data, identify ecological patterns, and respond more effectively to environmental threats.
In this article, we will walk through the process of training YOLO11 to detect animals. Let’s get started!
Before diving into the tutorial, let's take a look at the different setup options and tools you'll need to train and use YOLO11.
The main tool you'll need is the Ultralytics Python package, which makes it easy to work with YOLO models for tasks like training, detecting objects, and running inferences. To use the Ultralytics package, you'll need to set up an environment to run your code, and there are various options you can choose from.
Here are some of the most popular options for setting up your development environment:
While there are other options for setting up your environment that you can explore in the official Ultralytics documentation, the three options mentioned above require very little setup and are easy to use, making them ideal for getting started quickly.
In this tutorial, we'll showcase how to set up and train YOLO11 using Google Colab, Jupyter Notebooks, or a simple Python file, as the steps are very similar across all of these environments.
After selecting a development environment, to train YOLO11 to detect wild animals specifically, we need a high-quality dataset of labeled images. Each image should clearly show where the animals are and what type they are, so the model can learn to recognize them through supervised learning.
In this tutorial, we’ll be using the African Wildlife Dataset. It is supported by the Ultralytics Python package and is specifically designed for detecting animals commonly found in African ecosystems. It contains annotated images of four key species: buffaloes, elephants, rhinos, and zebras.

Here are some key features of the African Wildlife Dataset:
Now that we’ve explored the African Wildlife Dataset, we can get started with training a YOLO11 model to detect animals in images. The process involves setting up the development environment, training the YOLO11 model, and evaluating the model’s performance.
To get started, we'll prepare an environment for training and testing the model. Google Colab, Jupyter Notebooks, or a simple Python file can be used, depending on your preference. Create a new Google Colab notebook, Jupyter Notebook, or Python file accordingly.
If you're using Google Colab, the environment by default runs on a CPU (Central Processing Unit), which can slow down training. To speed up the process, especially for larger models, you can switch the runtime to use a GPU. In Google Colab, you can navigate to the "Runtime" tab in the menu, select "Change runtime type," and set the hardware accelerator to a GPU (preferably a T4 GPU). This is important for reducing training times.
Next, regardless of which environment you're using, you need to install the Ultralytics Python package. If you’re using a notebook-based environment (Google Colab or Jupyter), run the following command with an exclamation mark (!) at the beginning
pip install ultralyticsOnce the Ultralytics package is installed, the next step is to load the YOLO11 model and prepare the dataset for training. First, we load the YOLO11 model, which is already pre-trained on general object detection tasks. This pre-trained model gives us a good starting point, as it has already learned how to detect various objects.
Then, we specify the dataset using a YAML file, which contains information about the images and labels. This file tells the model where to find the dataset and what objects it should learn to recognize.
The African Wildlife Dataset is supported by the Ultralytics package, so it will automatically download when you start the training, saving you the trouble of setting it up manually.
Once the dataset is ready, the model begins training. The model will go through the dataset several times, a process called training over multiple epochs, to improve its ability to recognize animals in the images. During this process, the images will be resized to a consistent size for processing, and the model will work with a set number of images at a time, known as a batch. This helps the model learn more efficiently.
In short, the model is loaded, the dataset is automatically downloaded, and training starts running to detect animals based on the African Wildlife Dataset when the code snippet below is run.
from ultralytics import YOLO

model = YOLO("yolo11n.pt")

results = model.train(data="african-wildlife.yaml", epochs=30, batch=8)Once the code snippet above is run, the model starts training based on the settings we gave it. We’ve told the model through the code to go through the training images 30 times. So, it means the model will look at all the images in the dataset 30 times, each time learning a little more.
Imagine you’re trying to learn how to draw an animal. The first time you draw, it might not look good, but after practicing over and over, you start getting better. Each time you try again, you learn from what went wrong and fix it. That’s what each epoch does for the model - it looks at the images, makes mistakes, learns from them, and gets better at recognizing animals each time.
If the training code is running successfully, you will see the following output as the training progresses:

After the training process is complete, you can review and validate the model's performance metrics. In Google Colab, you can navigate to the "runs" folder, then to the "detect" folder, and finally to the "train" folder, where you’ll find logs displaying key performance indicators.
For users in a Python environment, the training results are saved by default in the “runs/train/” directory within your current working directory. Each training run creates a new subdirectory (e.g., runs/train/exp, runs/train/exp2, etc.), where you can find the logs and other outputs related to the training.
If you're using the CLI, you can easily access these results and settings by using the “yolo settings” command, which allows you to view or modify the paths and other configurations related to the training logs and experiment details.
Among the logs, you’ll also find some graphs that you can look at to see how well the model training process went. These graphs, created after the training is complete, show whether the model improved over time by making fewer mistakes and becoming more accurate.
They track the model's progress, showing how the loss (the difference between the model’s predictions and the actual values) decreased and how accuracy increased during training. This helps you understand how well the model learned to recognize animals and how much it improved by the end of the training.

Also, here’s a closer look at some of the metrics that you can use to evaluate the model's performance:
These evaluation metrics can help fine-tune the model to improve accuracy before using it in real-world applications.
Now that we have trained and evaluated YOLO11, it’s time to use it to analyze images and run inferences. You can use the test images from the dataset or new images from different sources.
We’ll use the following code snippet to run the model on an image in the test dataset. It imports the necessary modules from the Ultralytics library. It then defines the path to the best model weights file ("best.pt") stored in the results' directory. The custom-trained YOLO11 model is loaded using these weights.
After that, the path to an image from the African Wildlife test dataset is set. The model is applied to this image for object detection, the results are generated, and the output (such as detected objects or annotations) is saved.
from ultralytics import settings

best_model_path = results.save_dir / "weights/best.pt"

model = YOLO(best_path)

image_path = f"{settings['datasets_dir']}/african-wildlife/test/images/1 (168).jpg"

img_results = model(image_path, save=True)
The output image shown below will be saved in the "predict" folder located within the runs/detect directory. For subsequent tests, new folders such as "predict2," "predict3," and so on will be created to store the images.

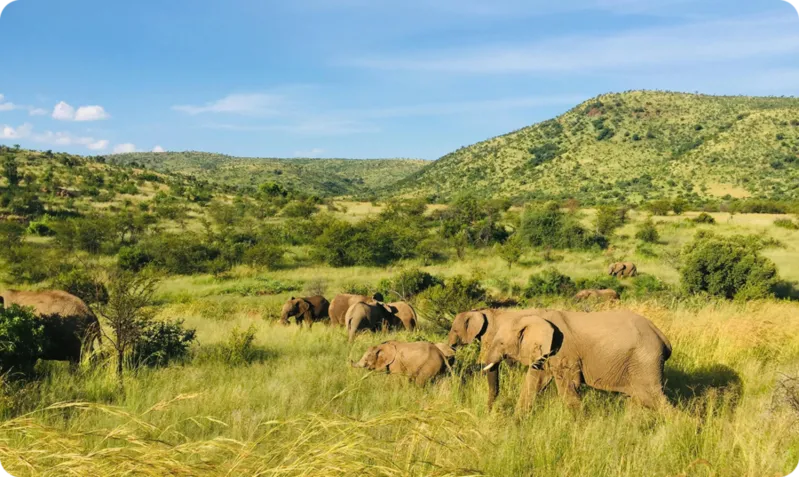
To test images from different sources, you can use the code below. We have used an image from Pexels. You can use the same image or any other relevant image.
best_model_path = results.save_dir / "weights/best.pt"

model = YOLO(best_path)

img2_results = model("https://images.pexels.com/photos/18341011/pexels-photo-18341011/free-photo-of-elephant-and-zebras-in-savannah.png", save=True)
The output image shown below will be saved in the appropriate folder.

Models like YOLO11 can automatically detect and track animals, which enables a variety of practical applications. Here’s a glimpse at some of the key areas where Vision AI can be used to support wildlife conservation efforts:
Computer vision models like YOLO11 can play a key role in wildlife conservation by automating animal detection and tracking. With Vision AI, we can process large volumes of images and videos from various sources, making it possible to run accurate wildlife assessments.
Ultralytics YOLO11, in particular, is a great choice for real-time object detection, making it a perfect fit for tasks such as anti-poaching surveillance, behavioral analysis, and ecosystem monitoring. By incorporating AI-driven models into conservation efforts, we can better protect species, improve biodiversity tracking, and make more informed decisions to safeguard endangered wildlife.
Join our community and explore the GitHub repository to learn more about computer vision. Discover more applications related to AI in healthcare and computer vision in manufacturing on our solutions pages. Check out the Ultralytics licensing options to get started with Vision AI.